


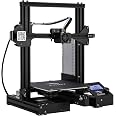
Official Creality Ender 3 3D Printer with Resume Printing, Stable Power Supply, Precise Printing, and V-Slot Rails, DIY 3D Printer, Printing Size 8.66x8.66x9.84 inches, Ideal for Mold Sample Printing
Details
- BrandCreality
- MaterialAcrylic
- Product Dimensions8.66"D x x
- Item Weight7 Kilograms
- Compatible DevicesPersonal

Description
🚀 Unleash Your Creativity with Precision Printing!
- POWER RECOVERY MODE - Never lose progress again—resume printing seamlessly after interruptions.
- GENEROUS BUILD VOLUME - Create medium-sized prototypes effortlessly with ample space.
- RAPID HEATING TECHNOLOGY - Get started quickly with a heated bed that warms up in just 5 minutes.
- EXCEPTIONAL PRINT QUALITY - Achieve stunning detail with precision nozzles for flawless models.
- VERSATILE MATERIAL COMPATIBILITY - Print with a variety of filaments, from PLA to TPU, for all your creative needs.
The Official Creality Ender 3 3D Printer is a versatile and user-friendly machine designed for high-quality printing. With a build volume of 220 x 220 x 250 mm and advanced features like resume printing and rapid heating, it caters to hobbyists and professionals alike, making it ideal for mold sample printing and prototyping.

Specifications
| Item Weight | 7 Kilograms |
| Item Dimensions D x W x H | 8.66"D x 8.66"W x 9.84"H |
| Printing Technology | FDM |
| Compatible Material | Polylactic Acid, Metal |
| Connectivity Technology | USB |
| Compatible Devices | Personal Computer |
| File Format | OBJ |
| Enclosure Material | Acrylic |
Have a Question? See What Others Asked
Reviews
J**.
Watch YouTube On-line Beginner Videos BEFORE Building - Assembly Sheet Is VERY Confusing
Watch the third-party free YouTube on-line beginner videos BEFORE building. The included assembly sheet is VERY confusing … and I’m an engineer! The videos make good points about how extremely important it is to make sure the printer’s frame is absolutely square in all three dimensions. Just gradually tightening the bolts in a rotation (like when tightening the bolts/nuts on a vehicle wheel) isn’t good enough.The Z limit switch mounting bracket has a nub on the left front corner (looking from the front of the printer). Some videos say to clip it off (e.g., with diagonal wire cutters or heavy-duty shears), which is the only way that I could get to perform the bed “leveling” process. The process actually positions the bed parallel to the X-Y plane of the printer’s frame (left-to-right, and front-to-back).Some people mistakenly try to use a carpenter’s level to “level” the bed, but if the printer isn’t sitting on a perfectly level table/bench surface, and the bottom of the printer frame isn’t exactly parallel to the supporting table/bench surface (not likely), a carpenter’s level won’t be of any use.Threading the printing filament past the gripping feed rollers and into the white feed tube to the print head is very tricky. Some videos show that it helps to unscrew the brass fitting attached to the feed tube and get the filament to protrude out of the right side of the feed mechanism about an inch (25 mm), then screw the brass fitting back into the mechanism after pushing the fitting over the protruding filament.That makes it possible to get the filament into the feed tube - I couldn’t have accomplished that step without that hint. Getting the end of the filament into the hole beyond the gripping feed rollers was extremely frustrating, as the hole is impossible to see, even with bright lighting, as the hole passes through a black plastic housing behind the very close rollers.The menu items are somewhat different on my printer from any of the manual versions (included on the USB thumb drive, on the Creality.com site, elsewhere on-line, or what’s shown in the videos. I was able to guess that the Motion menu item was what had to be selected from the main menu in order to get to the Auto Home and Disable Steppers menu items, needed to perform the “leveling” steps.Once I had stumbled through the assembly sheet, then discovered the YouTube videos and done things right, printing was pretty straightforward using the built-in micro-SD card reader. I haven’t been able to scale a model down in the included Creality subset of the free, open-source Cura “slicing” software.The provided gcode files print just fine, but not the .stl files after scaling and saving as gcode files. The printer only displays and prints from gcode files that the slicing software generates from .stl (3D Object) files. I’m trying to resolve this issue via on-line searches and forums.
H**Y
La calidad y puntualidad
Todo bien pero recuerden que en las especificaciones de entrega pido que mis compran vengan en una caja adicional a la original para más protección por favor es importante para mí que cumplan con eso
R**I
New to 3D Printing and Very Happy with the product
I've wanted a 3D printer since they had their first surge on the consumer side years ago, but never had the disposable income to pick one up. I finally decided to pull the trigger on it and am very happy with what I got.(Picture descriptions in Part 3- Use)## Why Ender 3:Before purchasing I watched a bunch of videos from various people and even though they consistently said "I like X printer over the Ender 3" most of them would also qualify their opinion with "I've owned 2-3 Ender 3's". Frankly, if you've bought a product that cost a Couple Hundred Bucks *MULTIPLE* times, then I can only take that as an endorsement.I also looked at many samples from Ender 3 that made me confident that the quality would be acceptable.Furthermore, it's pretty clear that Ender 3 is easily mod-able and is well supported within the community, so it seemed like the easiest machine to troublehshoot/fix/improve if I needed to (and I assumed I would need to)## Assembly:I have some degree of mechanical intuition (nothing I would boast about, but I can get around alright), so even though the instructions only had pictures, I was able to get through about 80% of the assembly easily.The X gantry (the crossbeam assembly with the hotend, in case I'm using the wrong part name since, again, no text in the assembly instructions) was a bit ambiguous based on the pictures so I had to pull up a video tutorial to assemble that.The wiring instructions were also a jumbled mess that I had to stare at for about 10 minutes before finally realizing what went wear (even then I initially plugged the "x" stepper cable into the "z" stepper and only realized my mistake when I couldn't find a place to plug the x limit switch's cable).## Use (with pictures)I spent about 15 leveling the bed using the ubiquitous "Paper Method" that I had seen on several Youtube videos (put a paper between the nozzle and the bed and then adjust until the paper has decent pressure but can still be moved).Picture 1 is the Bed Leveling test print I used at that point, which told me I needed to spend another 20 minutes leveling the bed again.After that I started to print the Test Dog Creality provides. While it was printing, I found out via Google that a) it was going to take longer than I wanted to wait, and b) the filament Creality provides isn't even enough to print the Dog (which seems really shortsighted to me, since most beginner users like myself would assume that you would be able to print at least one of the test pieces with the provided filament).During those two initial prints I had heard this "Pacman" type noise (similar in tone to when you pick up the power dot). Since it sounded like your typical piezo/computer board speakers, I found a cover for the one on the Ender 3's PCB and printed it out.As you can see (top of Picture 2) it came out pretty badly warped. It was late so I continued printing to use up the rest of the filament, but the following morning I did some research and found it was probably because my X Belt was a hair loose; felt tight to me, but I gave it a good tug to make it as tight as I was willing (I didn't want to break anything after all) and I haven't had any problems sinceI had also already downloaded a whole list of interesting things to print so I picked out the Wire clips to use up the rest of the filament (Picture 2- bottom). I didn't notice the warping as much on those ones, but the walls clearly had gaps in them. I wasn't able to find an explanation for that one on the internet, but haven't had that problem since I tightened the X Belt, so I assume that's all it was.The following day after work I pulled out the last of the starter filament and put on the roll I had bought with the Printer and printed my first Benchy (Pictures 3 and 4). While there are some clear defects in it I'm actually extremely happy that it turned out as well as it did (I'm a bit of a pessimist).Based on the Benchy, I re-leveled the bed again and have since been printing upgrades to my Ender 3 which have all been turning out extremely nice: I had 1 burr on a 1 screw hole and some very, very light stringing on one of the 10 pieces I've printed so far.## Final Note of SignificanceDon't under estimate how long it takes to make a 3D print. Going into this I was of the opinion of "Well, **I'm** not doing any of the work, so it doesn't matter how long it takes", but there are two hang ups that I didn't really factor in.First, when you're excited to have something Printed you're inevitably more impatient to have it done. I'm a pretty patient person, but even for me I end up sitting at my desk glancing every 15 minutes to see how much longer it's going to be before I move onto the next piece.Second, smaller pieces may take significantly longer, depending on their shape and quantity. As an example, I'm currently printing the recommended Cable Chains for the Ender 3. After this review is done I'll take the mounting clips off the bed and then print the *Bottoms* of the Chain Links. Just looking at the Chain Links, they seem like they should be pretty small and that they should get done relatively fast.THEY WILL TAKE 11 STRAIGHT HOURS!There are 3 primary reasons for this: I need 25 of them; they have long, vertical extrusions; and they are thin. Because those extrusions are vertical, they get sliced into many layers instead of just a couple (if they were horizontally oriented). Because they are thin, the printer can't take a shortcut by just using an infill mesh on the inside. Finally, because it takes extra long because of those other two points, the quantity because a serious factor as well.And that's just the *Bottom* of the clips: I'll have to print the Top of them after that...## Bottom LineDespite that last point, I still love this printer and look forward to continuing to use it for a long time in the future.
Common Questions
Trustpilot
1 day ago
4 days ago
